From Web 1.0 to Web 3.0 and Introduction to HTML
A bit of history
What became the web started out as an attempt to network and link up networks of computers at different universities around the world.
In 1989 Sir Tim Berners-Lee invented the World Wide Web as we know it. He conceived it as a way for Universities to easily share information and data.
By 1990 he had written three fundamental technologies that helped shape the evolution of the web as we know it:
- HTML: HyperText Markup Language. The markup (formatting) language for the web.
- URI: Uniform Resource Identifier. A kind of “address” that is unique and used to identify to each resource on the web. It is also commonly called a URL.
- HTTP: Hypertext Transfer Protocol. Allows for the retrieval of linked resources from across the web.
With these three technologies people began making simple web pages.
Sir Tim-Berners Lee made sure that the code underlying all of the technology for the web was released on a royalty-free basis, to ensure that the web could grow and wouldn't be under anyone's control.
Find out more about the history of the Internet at History of the web.
Web 1.0
The beginnings of the web are often referred nowadays to as Web 1.0.
This refers to a period in the '90s when the web was simply static pages, with links between them. Interactivity was limited, the pages didn't 'do' anything, they simply displayed information to visitors, much the same way as print media does today.
During this period the main functionality of a website was provided with static pages, hyperlinks (links to other pages) and... that was about it.
Technologies
Web 1.0 relied heavily on simple HTML markup, with limited interactivity provided by server-side PHP scripting.
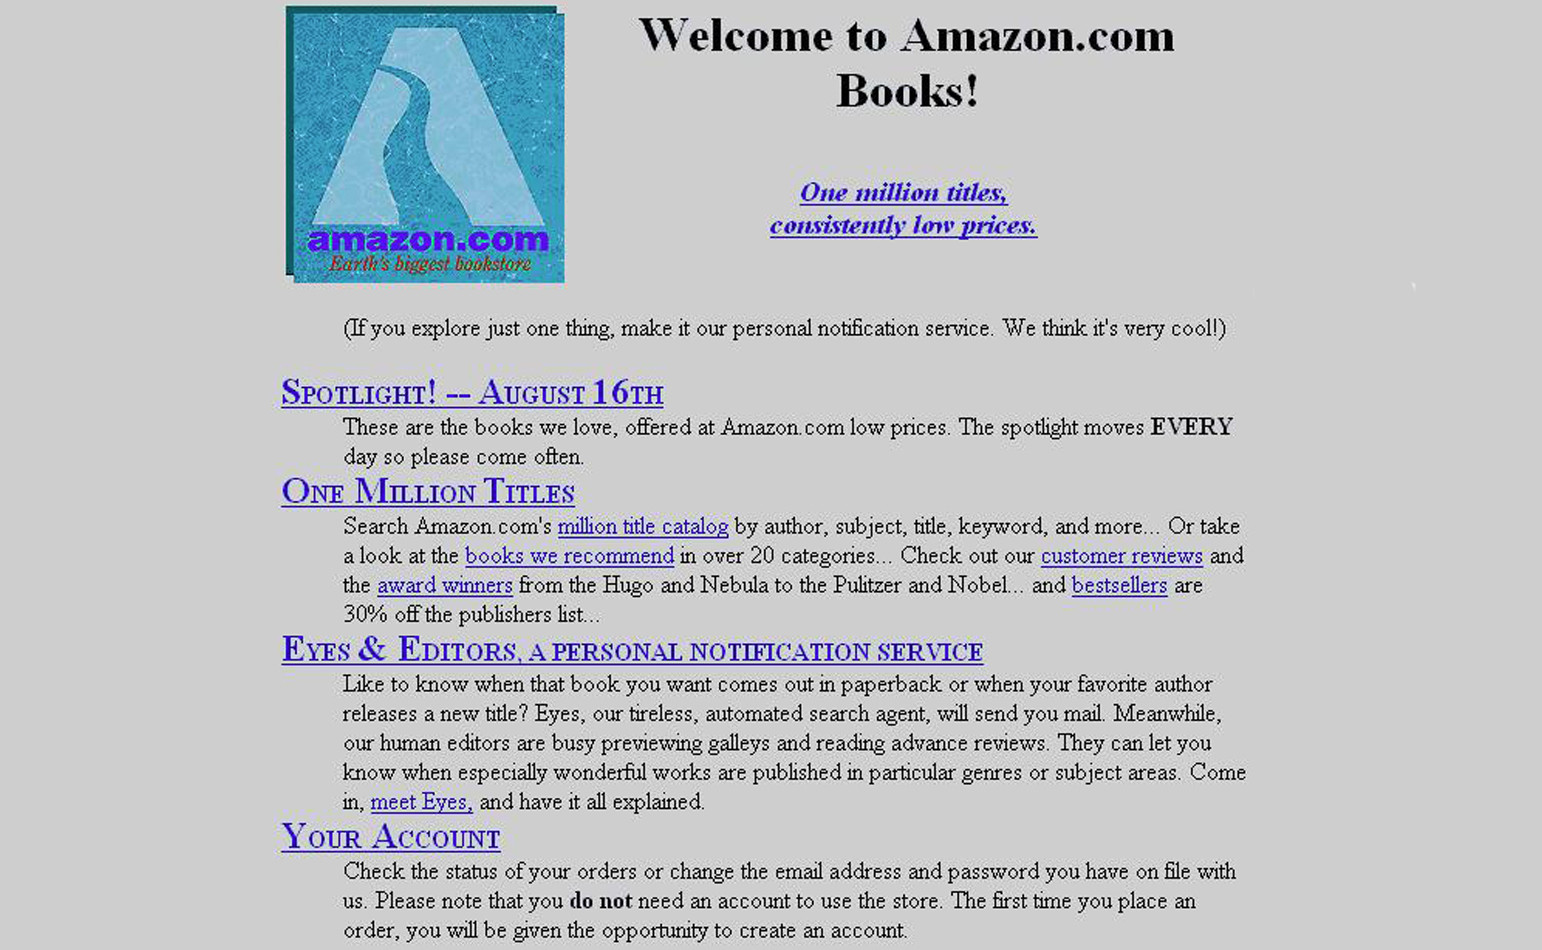
Some truly awesome Web 1.0 websites are still alive today! Check out :
- From 1996: The website for the '96 Dole/Kemp US presidential bid
- From 1997: A fake website for fictional comapny INGEN from the Jarassic Park films set up as a viral marketing campaign
- Still updated today! Arngren.net a norweigian website selling... I can't work out exactly what but it includes cars, bikes, toys...
Web 2.0
What we now call 'Web 2.0' started to rear it's head in the early 2000s. Websites began putting an emphasis on user-generated content and ease-of-use. Examples of essentially Web 2.0 interactions and uses are blogging, leaving comments, tagging and liking pages.
The idea behind Web 2.0 was that existing content could be supplemented or improved by allowing user contributions, and users could even generate content that would interest other people. This was the advent of the 'Network as a platform' - websites were no long simply portals where a few select people published content for the world to read, they were platforms where people could share and exchange information and content.
The first blogging platforms such as livejournal and skyblog were archetypal Web 2.0 platforms, which relied on a large user base contributing content regularly to attract more users. Indeed one of the main characteristics of Web 2.0 is that it offers all users the possibility to contribute to the discussion.
Technologies
In terms of technologies, Web 2.0 relied much more on interactive technologies:
- PHP or Perl for managing User Generated Content on the server side
- Flash and later HTML5 for user interactivity
- Javascript and most recently Ajax for seamless no-reload-necessary real-time information and interactivity.
The Wikipedia Article on Web 2.0 has a lot of nice examples making the distinctions between Web 1.0 and 2.0 really clear. I recommend you read this article.
Web 3.0
So what is Web 3.0? Most experts would agree that we aren't yet really 'in' web 3.0. Rather we're currently seeing some websites transition towards more Web 3.0 models.
What exactly we mean by web 3.0 can be hard to define, as it defines the direction that the Internet is currently going in, without knowing what it will look like when we get there...!
What we can say is it will certainly feature some or all of the following trends :
Artificial Intelligence
It's clear that Artificial Intelligence will be one of the 'Next Big Things' in the web.
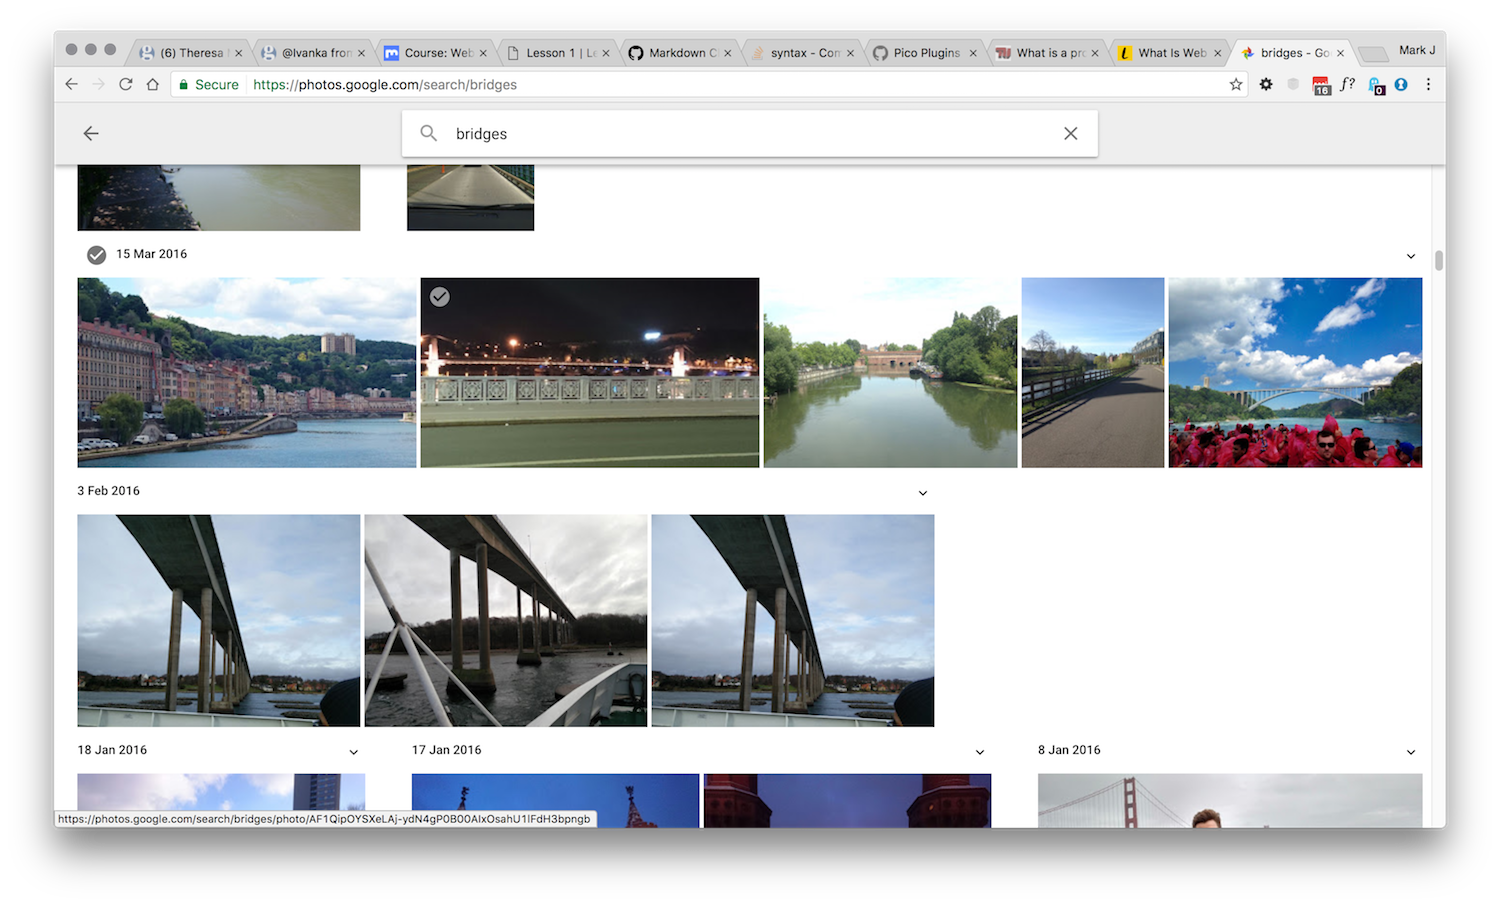
Google photos launched it's 'Intelligent Search' last year, demonstrating the simplicity possible by using Machine Learning AI. Try searching your Google Photos library for 'bridges', and you'll see pictures of bridges from your photos :
The growth of targeted advertising based upon your Social Media accounts and purchasing history, using Artificial intelligence is another possible trend that will grow in Web 3.0.
Virtual reality
Another possible direction the Web 3.0 could take is Virtual reality. More and more websites with 360˚ experiences are popping up and the W3C WebVR standard is gaining steam.
Pervasiveness
Others feel that the web will become even more 'ever-present' in Web 3.0. Currently the web is appearing on smart-phones, tablets, watches, in our cars, on our smart-fridges... and this is clearly an indicator of an upcoming revolution in the way we use the web. Some have dubbed this Web 3.0
Technologies
Web 3.0 technologies include usage of lots of HTML5 components such as:
- video and audio players
- in browser 3D with WebGL
- Virtual reality with WebVR
- Animations and interactions with canvas and SVG
On the Server-side the use of machine learning and AI often translates as usage of Big Data systems, with languages such as Java.
What is a website ?
Now we understand roughly what the 'World Wide Web' is, it's time to take a look at the parts that make it up, namely Websites.
A website is, to put it very simply, a collection of files and code, hosted on someone's server somewhere. Websites come in all shapes and sizes, and I'm sure that you all use tens or hundreds of websites every day.
In this class we'll use the terms server and client quite a bit. A server is just a computer (often a big powerful computer) which is going to let us have access to some files or information remotely over a connection. There are lots of types of server (email server, file server...). In this case we'll be talking mostly about web servers.
The biggest websites such as Amazon, Google or Facebook are massive structures of hundreds of servers which are interlinked, but the simplest websites are simply a single server, which has some files on it. These massive behemoths of the web are what we call 'Web Platforms'. You might also be familiar with some 'Web apps', applications like Google Docs which allow us to perform useful functions right in the browser.
For the purposes of our course, we'll focus on the smaller web sites, such as the website showcasing a small or medium-sized business or a blog.
When you type http://www.example.com into your browser, you see the following:

What's really happening behind the scenes here?
Well, a few things are happening pretty fast :
- Your web browser tries to make sense of what you typed into your address bar.
- The browser locates the server you want.
- The browser connects to this server.
- The browser asks for the content of the page.
- The server responds by sending the content of the page (as computer code).
- The browser looks at the code, and displays a graphical representation of the code - the 'page'.
Now let's break it down.
Step 1: The URL
What you typed into your address bar is called the URL or Universal resource locator. It's called universal because it can be used for pretty much any kind of resource, and in many different contexts (not just in your browser!).
All URLs are made up of several parts. Take the following URL as an example:

-
First we have
https://. This part is called the protocol and is always followed by://. In our case the protocol ishttpswhich stands for HyperText Transfer Protocol (Secure). We don't really need to enter into too much detail about the protocol, but you can think of the protocol as the format and order that the data will be exchanged in. It's like defining the order of exchanges in a conversation between two people. Most conversations start with a greeting like 'Hello', followed by a response of 'Hello' from the other party. Then one party will ask for some information, and the other party will provide it. A protocol simply defines the rules about what format and order these messages come in. Take a look at the image below for a visual explanation, or check out the link below for a more detailed explanation: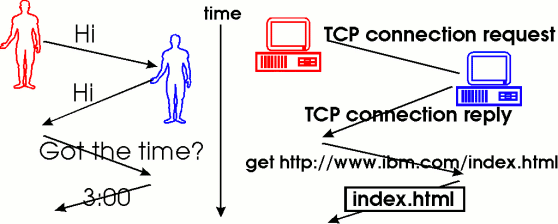
What is a protocol
Therefore, by saying "https" we tell the server that we're expecting the exchange with the server to follow the standard https conventions. -
Next comes
moodle3.unistra.fr. This is the domain and a good analogy to think of this is the name of a building or company when you're sending a letter. In this case the domain has three parts :moodle3,unistraandfr. From right to left:- the
fris what we call a Top Level Domain. In this case it's a geographic top level domain (.frare only issued by the French government), but there are other domains such as.comand.netwhich are issued by private companies. - the
unistrais the main domain. This indicates most often the company or organization that registered the domain. In this case it was University of Strasbourg. The main domain owner is usually wholly responsible for... - the sub-domain, which here is
moodle3. Another very common sub-domain iswww. In this case these three parts make up our domain. Further down in this lesson we'll talk about how this domain tells our computer how to contact the server in question. For this part, just think of this domain as the location of the server we need to talk to.
- the
-
After the server name, we have
/course/view.phpThis is often called thepathand it tells us which file we want to access on the server./course/tells the server we want to look in the folder calledcourseon the server, andview.phptells the server to show us the file with that name. You might have seen paths like this before on your own computer. On Windows folders are seperated with\back-slash, but the convention on the web and in URLs is to always use a forward-slash or/, as is already the case on Mac and on Linux machines. -
Finally, we have
?id=7507. This is called a parameter. In some URLs you can have lots of parameters, in which case they will be separated with a&. The parameter is some value or information that the browser wants to send to the server. In this case, the parameter is telling the script at/course/view.phpto use the id 7507. In the case of Moodle, the simply means to show us the course with the ID 7507.
Step 2: Looking up the IP
So now the browser has a URL, it knows what protocol we want to use, what domain we are looking for, the location of the file we want, and the parameters we want to send along to the server.
However, the domain of a website doesn't actually tell us where the server is locate, or even how to reach it. Domains were actually invented as a way to have nice human-readable server names, but they don't really help us locate a server.
In order to find out where the server is and how to get there, the browser looks up the domain name in a directory - called a DNS or Domain Name Server - and the DNS returns the browser an IP address. This process is similar to how you might look up the phone number for a person in a phone book.
The IP address for a server is like a street address. It tells us where it is located and how to reach it. All devices connected to the Internet have an IP address, even your computer.
To find out your own IP address you can simply open google.com and type what is my IP.
When when we look for a web page, our browser takes the domain - in this case moodle3.unistra.fr - and looks up the IP address that corresponds to this server.
You can try this out yourself!
- On Windows open a command prompt by opening the start menu and typing
cmdand pressing enter On Linux / Unix / MacOS open a Terminal (on MacOS this can be found in Applications/Utilities) - Type
nslookup moodle3.unistra.frand press enter. - You should see a few lines in the Terminal, including an Answer section with an IP address (see the screenshot below).
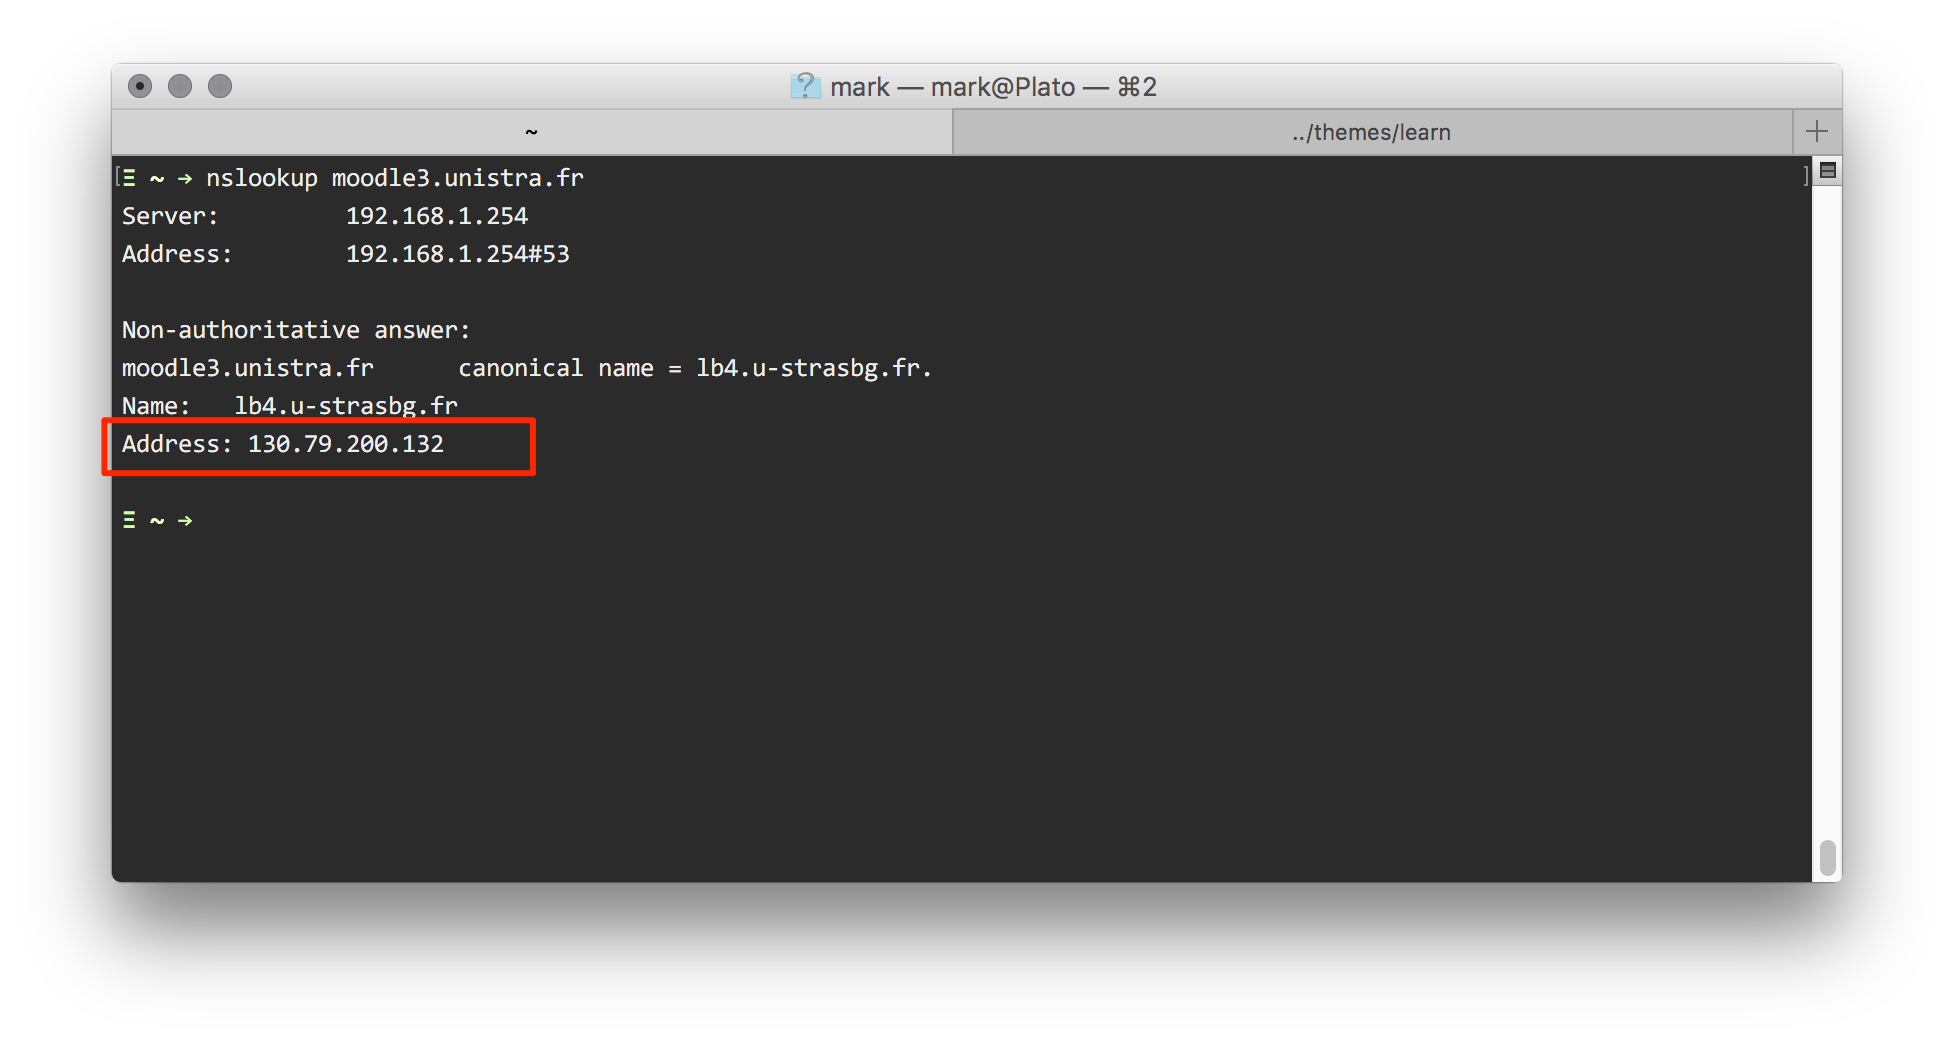
Great! Our browser does this in the background so you don't see it, but it's the same process!
So now our browser knows the IP address of our website. Onto...
Step 3: Connect to the server
The browser connects to the server on the given IP address. You don't need to know much about this step, but it basically request a connection to the IP address that the server is located on.
Step 4: Ask for the page
Now the browser is connected, it will ask the server for the content of the page. To do this, it uses the format and order defined in the http protocol.
This means in practice that the browser sends the following command:
GET https://moodle3.unistra.fr/course/view.php?id=7507GET in the HTTP protocol just means 'Send me the following page please'.
Step 5: The response by the server
According to the HTTP specifications, the server should respond with a status code to the browser. You probably already know one famous HTTP status code: 404.
If you look in the HTTP specification, you'll see that 404 corresponds to File not found.
In our case, the page does in fact exist, and so the code returned will be 200 or 'OK'.
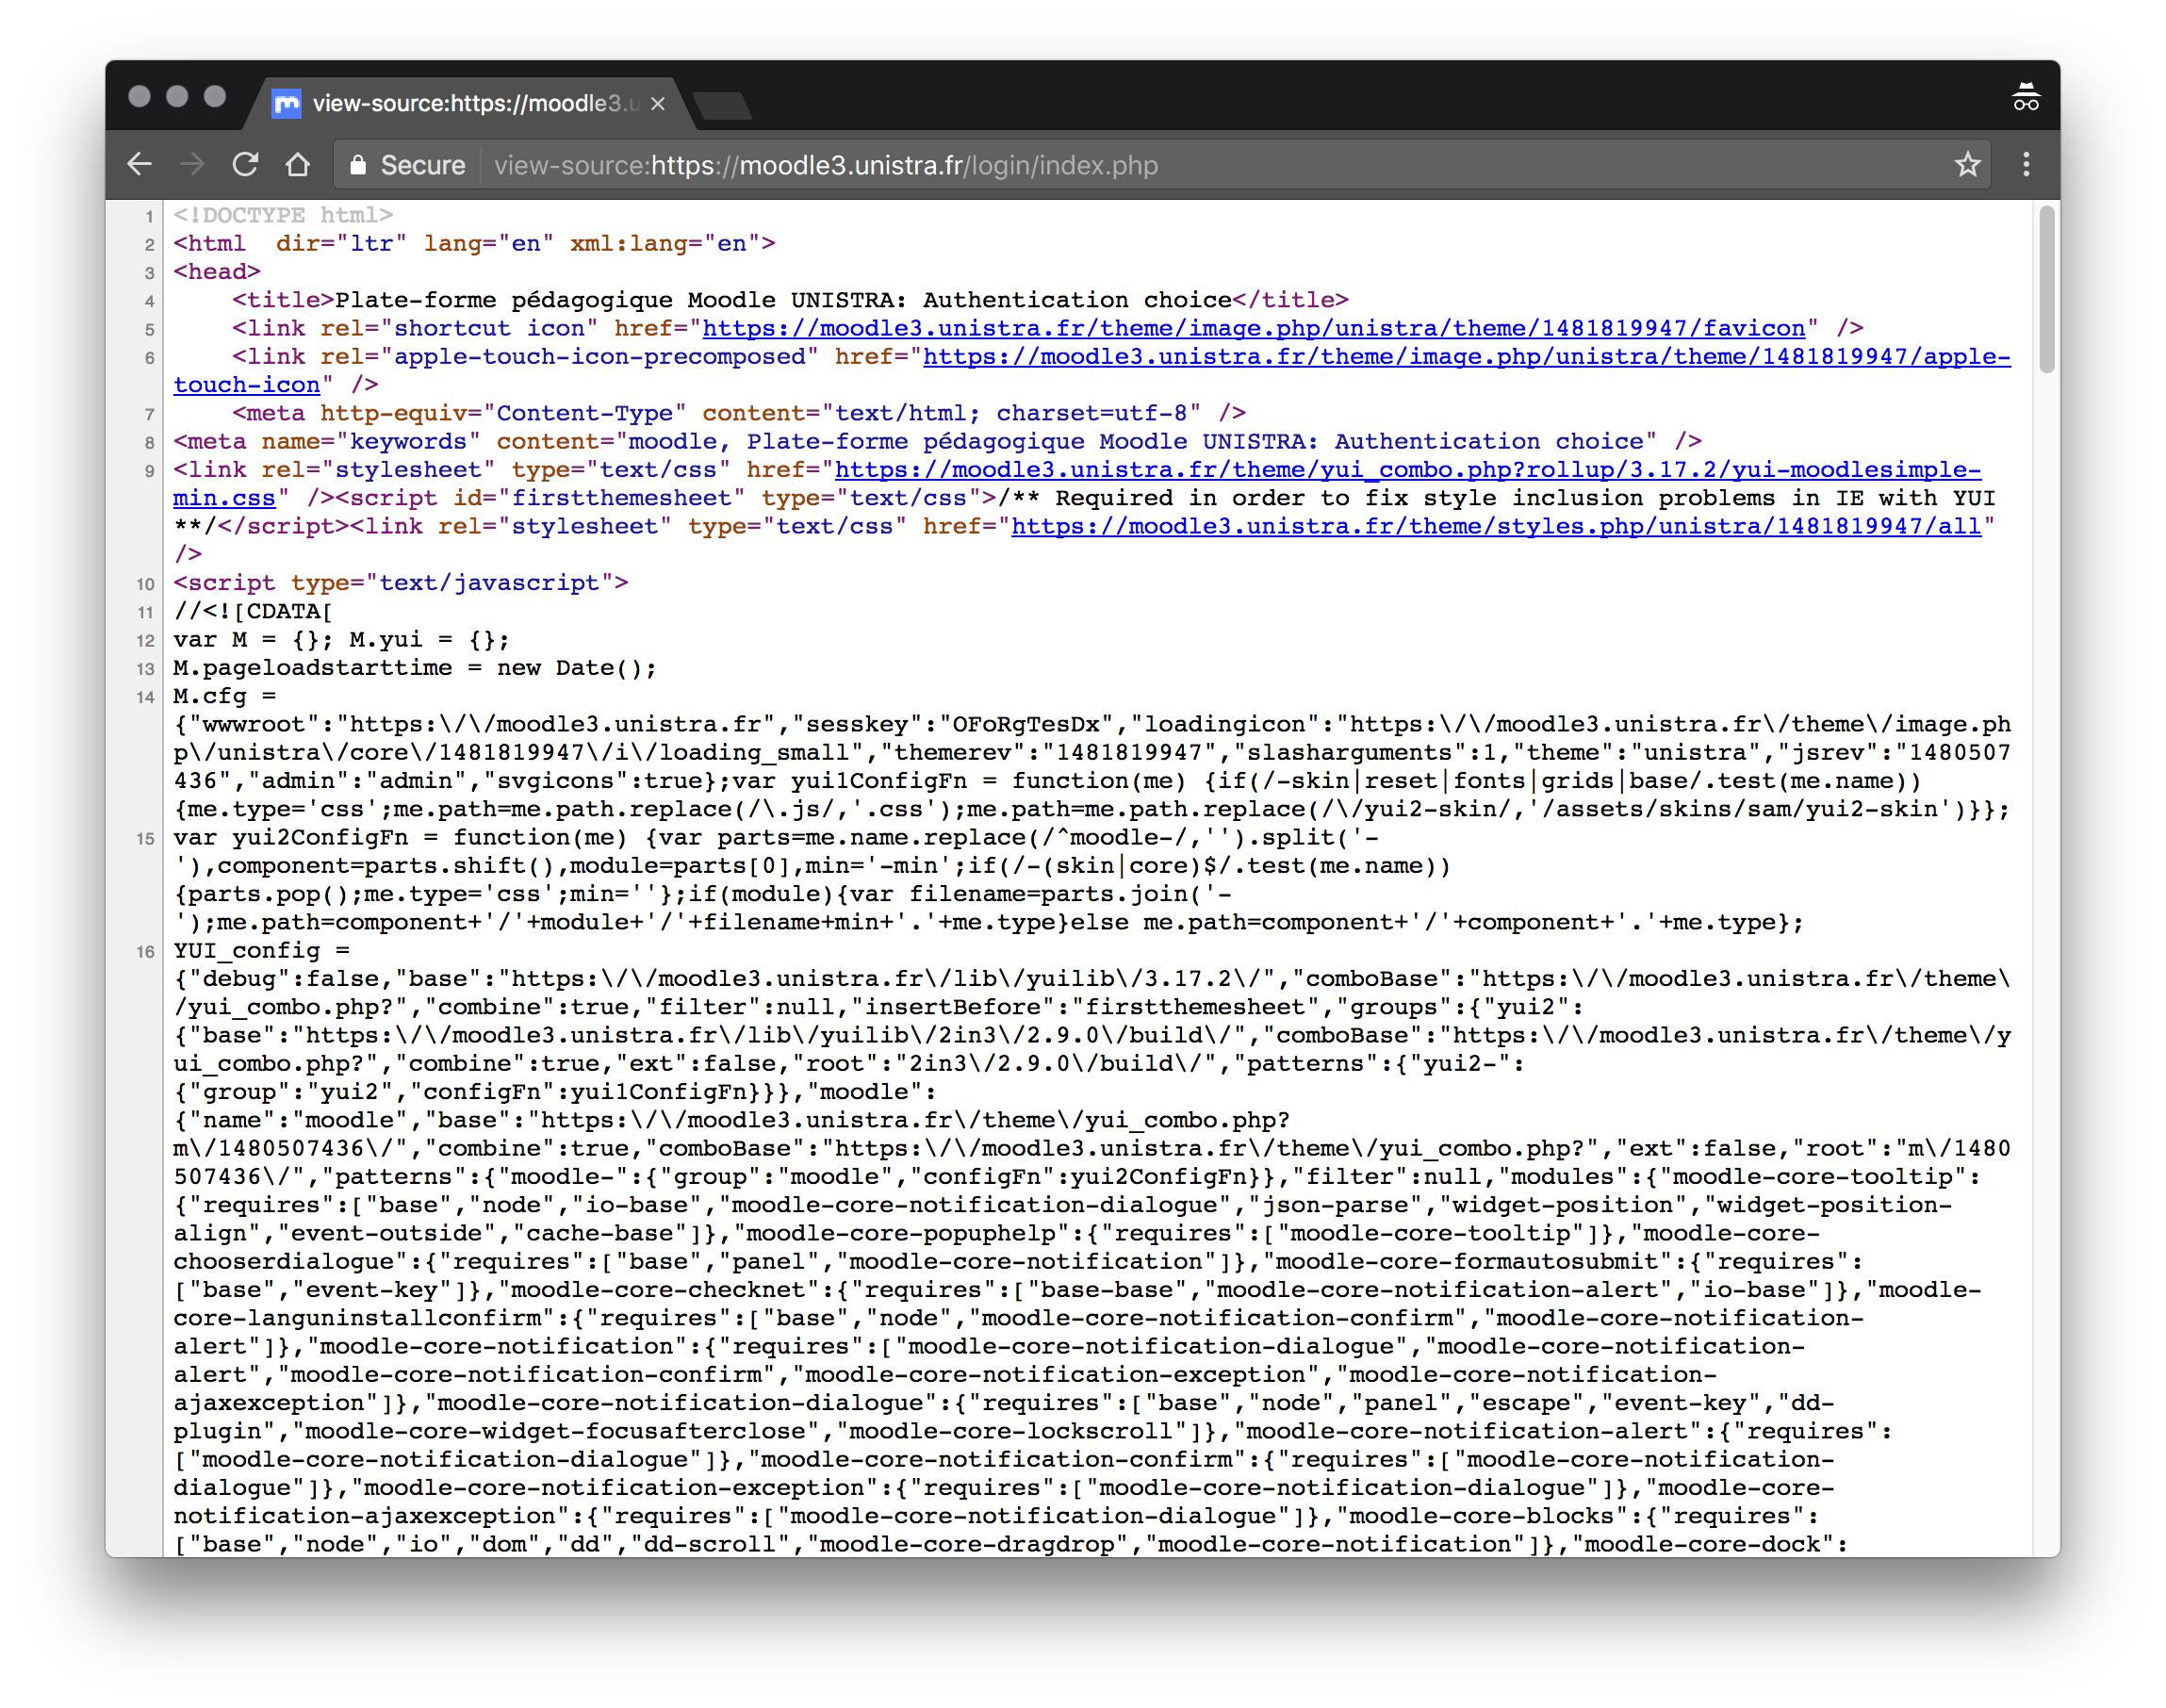
Along with this code, the server will send all the raw code of the web page. In 99% of cases, this code is HTML, CSS and Javascript.
On any web page, you can press Ctrl+Alt+U (or ⌘⌥U on mac) and you'll see the raw code sent by the server. This is the code that the server sent back to the browser. When you look at a web page, what you see in the main browser window is the browser's rendering or interpretation of this code.
Step 6: Rendering
Based upon all this code, the browser creates a graphical rendering of the page. The rendering is what we think of as the 'page' - it's the graphical representation of the raw HTML/CSS/JS code.
To do this, the browser reads the code from top to bottom, and displays the representation of the code, by following the standards for the languages used in the page source code.
The most common languages used for this are HTML, CSS, and Javascript. Each language has a specific role and they are almost always used in combination.
These languages tell the browser respectively what content to display, how it should look, and how it should interact with the user.
Not all browsers interpret all HTML, CSS and JS code in exactly the same way!
This is why Web Developers often make fun of Internet Explorer (and more recently, of Safari) as these browsers occasionally render code in a non-standard way.
Each browser is supposed to implement the W3C defined 'Standards compliant' way of coding, but this isn't always the case.
For the techniques you'll learn in this course, all browsers should render them correctly in the right way. But you should be aware that sometimes they can be different, which is why you sometime might find a website that works fine in Chrome but not in Safari or looks great in Firefox but not on your Windows Phone.
Introduction to HTML5
What is HTML5 ?
HTML or HyperText Markup Language is, as its name would suggest, a markup language. A markup language is not quite the same as a programming language: a markup language allows us to give structure to content, and gives it some basic styles, but doesn't allow us to use logic like a true programming language (there is no 'if this, then that' in markup, there is no interactivity). You can think of markup as a language that defines layout like the layout of a Word document. It gives the document structure and tells the browser what each element is and what it does.
The HTML standard is defined by the W3C or World Wide Web Consortium. HTML5 is simply the latest version of this standard. It was initially released in 2014.
Writing your first web page
Remember when we opened the web page 'source code' above? We saw a lot of code and text. This is the HTML (and CSS and Javascript) behind the web pages we see in our browsers. HTML, CSS and Javascript are not compiled languages. In simple terms this means that the browser simply reads the HTML/CSS/JS as standard text, and you can simply write HTML in a text file with a simple program called a Text Editor.
Let's write our first (very simple) web page.
- Open any text editor. On Windows this will be 'Notepad', on Mac you can use 'TextEdit', on Linux Gedit or similar will do. We'll talk about alternatives to these apps below. Make sure you use a text editor and not a word processing program like Word or Open Office.
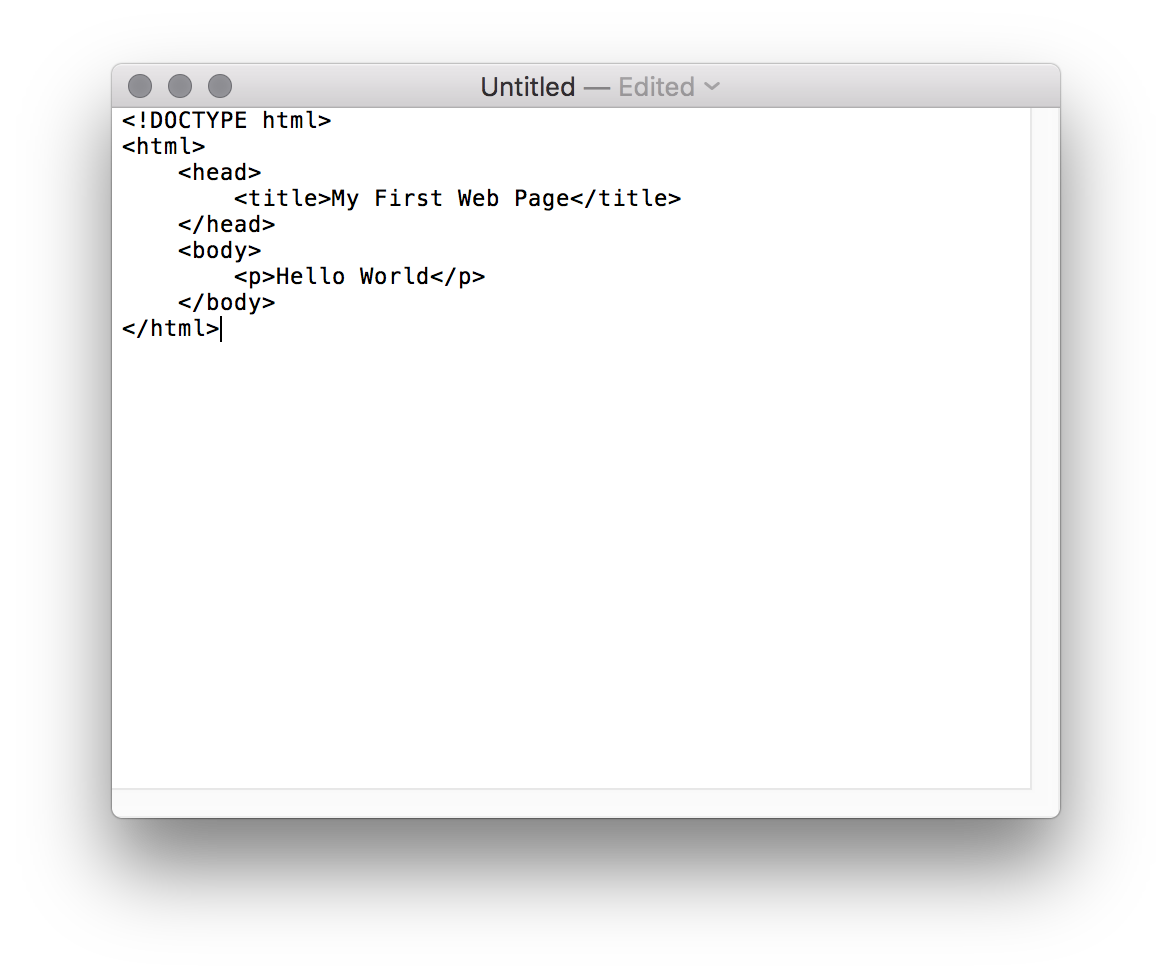
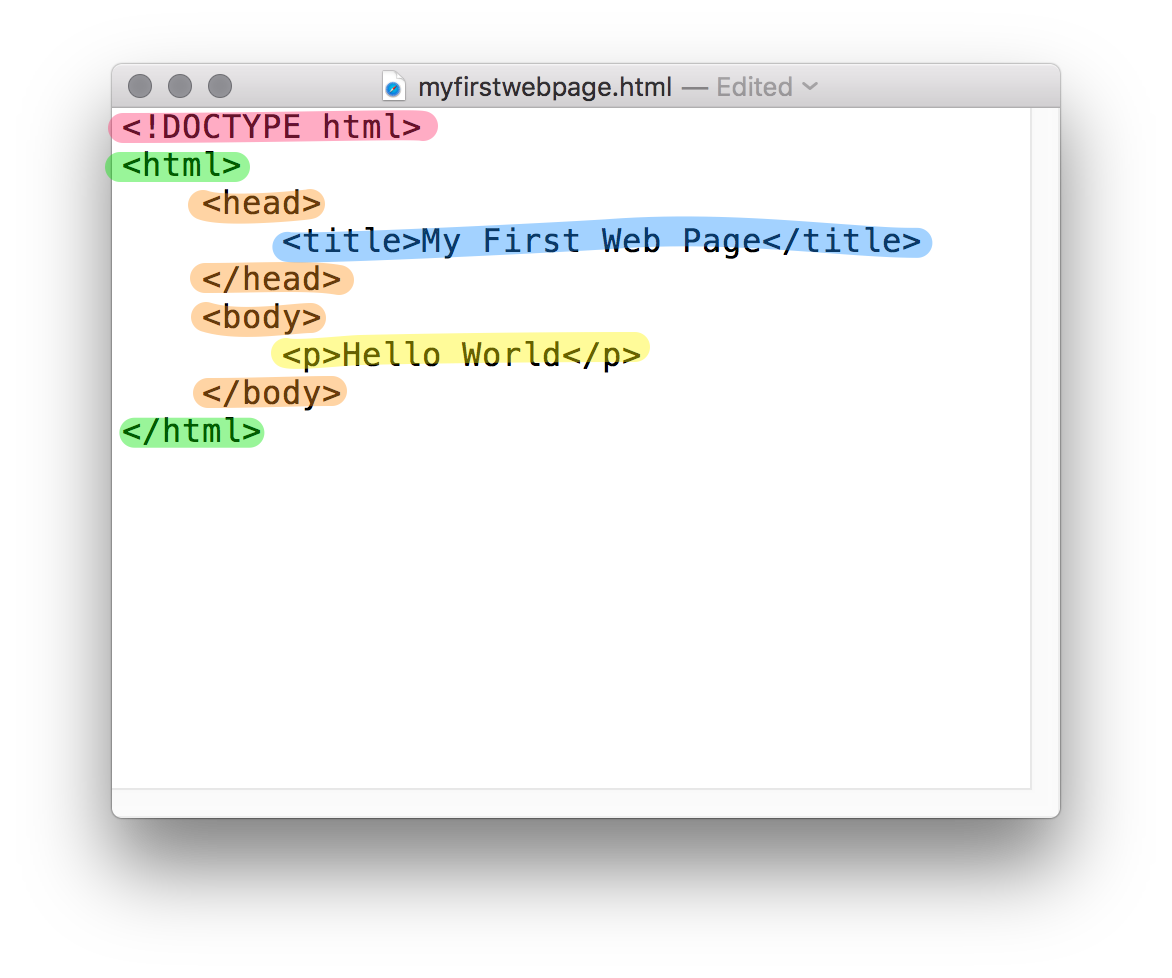
1b. If you're on Mac, make sure you switch TextEdit to 'Plain Text' mode by clicking Format > Make Plain Text. - In a new blank document, copy and paste the following:
<!DOCTYPE html>
<html>
<head>
<title>My First Web Page</title>
</head>
<body>
<p>Hello World</p>
</body>
</html>
It should look something like this :
Now save this file somewhere logical on your computer, and call it mywebsite.html. Be sure to make sure you add the .html to the end of the file. On windows you may have to change the file-type to 'All Files' in notepad.
This tells the operating system that the file contains HTML, rather than just old-fashionned text.
Now double-click the file and open it with a Web Browser (Chrome or Firefox are good choices, Internet Explorer or Safari if you must...).
You should see the following in your web browser:
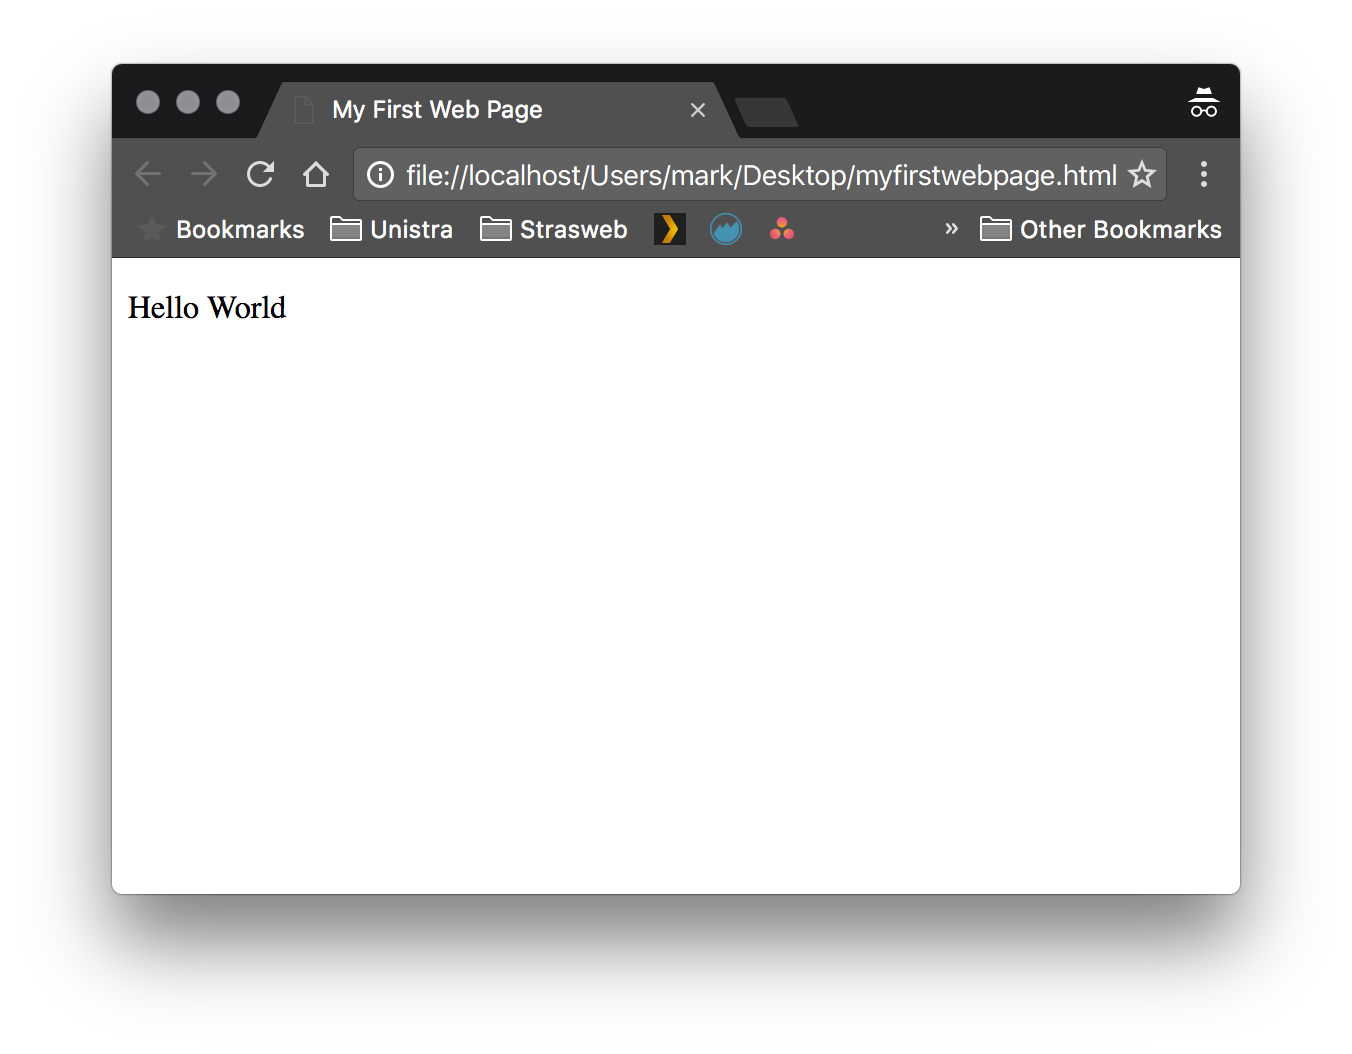
Voilà ! You just created your first web page!
HTML Structure
Now let's take a look at the different parts we just wrote, and what they did:
Basic principles
The first thing you'll notice in HTML is that most of the markup takes the form of tags. A Tag in HTML is simply a keyword such as body or head which indicates to the HTML the element or type of element that you want to create on the page.
Almost all HTML tags take the following structure
<tag_name>Some text here</tag_name>.
All tags start with a < then the name of the tag, then a >. This is called the opening tag as it opens the HTML element. Everything we write after this tag will be 'inside' the element we defined, until we write the closing tag. The closing tag is written in exactly the same way, except that we add a / or slash before the keyword.
Take a look at the line highlighted above in blue:
<title>My First Web Page</title>This tells the HTML :
- Start the 'Title' tag
- The content of the title is "My First Web Page"
- End the title tag.
In the case of the <title> tag, this tells the web page what to display in the top of the 'tab' of the browser (go and take a look at your webpage in a browser, at the top of the tab or the top of the page you'll see it says 'My First Web Page').
Now take a look at the line in the image highlighted in yellow:
<p>Hello World</p>This tells the HTML
- Start a 'p' tag
- The content of the 'p' is Hello World
- End the 'p' tag.
In HTML the <p> tag indicates a paragraph.
There are a lot of other tags in HTML, all of them are defined in the standard which you can take a look at on the W3C site. I encourage you to use this reference site when you're writing HTML.
Breaking down our web page
Now we can identify tags as pairs with an opening tag and a closing tag, can you identify the other pairs of tags in your web page?
Take a look at your document, count the pairs of HTML tags. Can you see the pairs of tags?
- In green we have the
<html>opening and closing tag. This tag is obligatory for all HTML documents, and all the other tags in the document should be contained within it (except the DOCTYPE and we'll come to that in a minute). - In orange we have the
<head>tag, and then below it we have the<body>tag. These tags are also both obligatory in every HTML document.
The Doctype
The only part we haven't talked about now in this document is the red line at the top. This line is called the DOCTYPE and it is also obligatory for all HTML documents.
Other languages like XML also use the !DOCTYPE tag to declare their type !
In our case, <!DOCTYPE html> simply tells the browser 'This document is written in HTML'. In previous versions of HTML (HTML1, 2, 3 and 4) we used to specify the HTML version in the DOCTYPE, so that the browser knows which version of HTML to use to read each page. However, with HTML5 we now leave off this version declaration. So by writing <!DOCTYPE html> we're in effect telling the browser that the document is written in the latest version of HTML, that is to say, HTML5.
NOTE: Be aware that the DOCTYPE tag isn't really an HTML tag like the others. Notice how it starts with <! and it doesn't have a closing tag. It's a special case.
An aside: Choosing a text editor
Let's take a short break from HTML for a second to talk about Text Editors. For our example above I asked you to use Notepad or TextEdit or another default text editor available on your system.
There are many different text editors available either to download, and you can write HTML with pretty much any of them. There's even one installed by default on most operating systems (Notepad on Windows, TextEdit on Mac, Gedit on Ubuntu...).
However, although you can write HTML with any of these, it's not necessarily the easiest way to write HTML.
Most modern Text Editors, especially those written for developers, include a lot of nice features like auto-completion of your code, syntax highlighting, find and replace, useful keyboard shortcuts...
I suggest that you take a few minutes to learn about and install a better text editor than the default one for your operating system. You can try any or all of the following:
- My Personal Recommendation: Sublime Text (Windows/MacOS/Linux)
- Notepad++ (Windows Only)
- Atom
- Brackets
All of these tools can be downloaded and used for free (although Sublime will nag you to purchase it from time to time).
Now take a few minutes to research the different text editors, download and install one that you think you might like. Check out features like automatic tag closing, and the keyboard shortcuts which can help you work faster.
For the purposes of this course, I will assume you're using Sublime Text, although it shouldn't matter which one you're using.
Building blocks
Let's recap what we just learned in the previous section from our first website :
- HTML files are just text files with the '.html' extension. We can open and edit them with any Text Editor.
- All HTML files must start with a
<!DOCTYPE html>declaration - All HTML files must have a
<html>element which contains all the other tags on the page. - All HTML files must have a
<head>element, followed by a<body>element. - All our other tags in the page must come inside either the
<head>or the<body>.
Now that you are a little familiar with basic HTML structure, let's introduce some tags that we haven't seen before.
Div
The <div> tag is a tag that you will see often if you work with HTML code.
It's what we call a non-semantic tag, that is to say that it doesn't have any 'meaning' with regards to the content. The tag <p> means paragraph, which tells us some information about the content. The tag <div> just stands for division, which doesn't tell us anything about what it contains.
In your web page, edit your HTML and replace the p tags with div tags. Now refresh the browser window. What effect does this have on your text?
What about if you put two divs, one next to the other, like so?
<div>My first div</div><div>My second div</div>
What effect does this have on the output?
Divs are often useful for structuring our content and dividing the page into blocks, which we will be useful later on when we see CSS.
Another useful thing to know about divs are they are the most basic block element that we will encounter. A block element means that they take up the whole width of the screen, and they will force a 'line return' - aka they will render as a giant block across the whole screen.
By default any block element will take the full width of the screen, and the height of the block will adjust to the height of it's contents.
You can use the browser developer tools to see the size and shape of each HTML element in your page.
This is a very useful tool when writing HTML code.
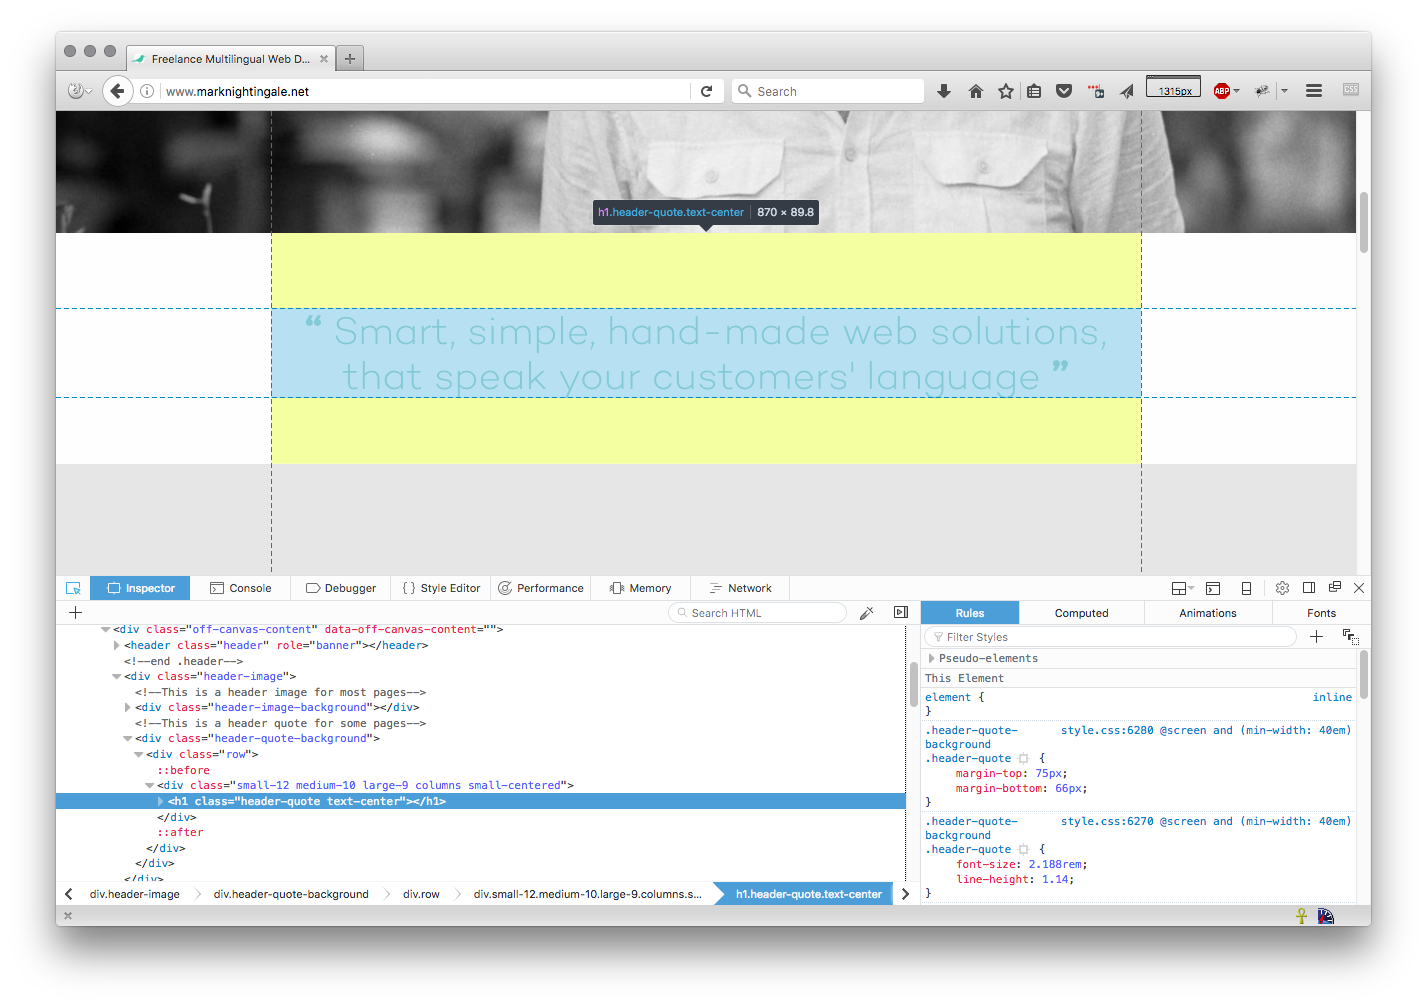
To find out how to use this tool, take a look at the guides below.
We'll be using this tool in future lessons so it would be good for you to be familiar with using it.
Take a look at the following tutorials on how to use the developer tools in:
Nesting HTML
So far we've only seen elements standing alone. But HTML is almost always nested, that is, one or more HTML elements are written inside other HTML elements, which are within other HTML elements...
Consider the following HTML code :
<div>
    <p>This paragraph is awesome</p>
    <p>This paragraph is even more awesome!</p>
    <p>
        <em>This paragraph is italic!</em>
    </p>
</div>
The first 2 paragraphs are children of the main 'div'.
The last paragraph is the child of the main div, and also the parent of the <em>. <em> tags add emphasis (usually through italics).
In this way, one HTML element can sit inside another, as its child, or it can enclose the whole element, and is then its parent.
When we write HTML, and most other programming languages, it is a best practice to indent our code. We do this by using either tabs or spaces to line up each of the opening / closing tags of elements that are over more than one line. This allows us to easily see which opening tag corresponds to each closing tab.
Like a lot of programming languages, HTML will just ignore white spaces and line returns, so you can indent, and add line-returns without worrying about changing the layout of your document.
Like all best practices, your code will work just fine without indenting, but it's always a good idea to do it anyway to improve legibility.
How NOT to nest
When nesting HTML (that is, most of the time you'll be writing HTML), you must be careful to close your tags in the reverse of the order they were opened.
Consider the following two examples :
<div>
    <p>
        Here's my paragraph
    </div>
</p>
In this example, we close the <div> before we close its child, the paragraph. This will cause weird things to happen in our web page (as the browser will try and ignore or work around the error) and can give unpredictable results. This kind if mistake might work in your browser, but it isn't valid HTML and can cause problems.
Instead we should write :
<div>
    <p>
        Here's my paragraph
    </p>
</div>
If you make the decision to write all your HTMl without indenting and all on the same line, it can quickly become very difficult to understand what tags should come next, so that's another good reason to follow the best practice.
Can you spot what's wrong with the code below?
<p><em><strong>This is</strong> my very awesome paragraph</em> What's in the <head>
As we saw above, like humans, HTML documents are made of two main parts :
- A
<head> - A
<body>
It might seem counter-intuitive, but everything we've talked about above (all the tags that display content in the browser) go in the body.
Basically, whatever you write in the body will be shown in the browser window. If you want to add any content to the page, you do so in the body.
So what exactly goes in the <head>?
The head basically contains meta information, that is information about your page.
This could include:
- The page title
- The styles (in CSS which we'll talk about later)
- The character encoding
- Information about the author
- A description of the page...
If you want to find out more about how to add information to the head, take a look at the following tutorial : The Head Metadata in HTML
Text essentials
As we have seen, we can use the tag <em> to add emphasis to HTML (usually by making it italic).
Do you remember we saw the 'Block' content-type above, and we said that <div> and <p> were both block elements?
<em> is an inline element. Whereas block elements create a 'block' of content on the page, an inline element sits in-line with other text in your page.
Try out the following code in your web page, and see what the difference is in how it is displayed. I suggest you use the Web inspector / Development tools to see what's going on:
This is some random text and <div>here is a div</div>.Now try this:
This is some random text and <em>here is some italics</em>.Do you see how the <div> element caused a break in the page layout, creating a new 'block', whereas the <em> element just followed the flow of the text?
This is true of all 'block' and 'inline' elements.
Important rule: One important rule to remember is that you should never put a 'block' element inside an inline element. This can cause strange formatting issues.
Now we've seen a couple of common 'block' elements, let's look at some common 'inline' elements :
span
Just as we saw 'div' which is a block element that has no other styles except for being a 'division', <span> is the same equivalent for inline elements.
Try out the code below, you should see that adding a span has no effect on the layout of the document:
This is some random text and <span>here is a span</span>.We'll see how span will be useful when we do CSS for selecting specific bits of text.
a
One of the most important inline elements is <a>. <a> stands for anchor, which for whatever reason is what we call a Link in HTML. Links take the user from one page to another. In order to take the user to a new page, we need to provide the URL for the new page, which we can provide in the href attribute like so:
This is some text <a href="http://www.google.com">with a link to google</a>. Try creating a link to another page in your 'First' web page
Note that you must use the full URL (with the protocol http or https) otherwise the link won't work.
All the HTML elements can take some attributes, whereas others are specific to a type of element. The href attribute is specific to <a> tags and a couple of other tags.
In the lesson on CSS we'll see how we can use some other attributes on any HTML element.
Notice how the attribute is in the format attribute_name="attribute-content". This is the format for all attributes (make sure you use an = symbol, and you can use single or double quotes). Don't put any spaces in your attribute name or around the = symbol.
strong
Just as we saw <em> which adds emphasis, <strong> adds 'strength' or 'even more emphasis' and is used to really make text stand out. This is commonly done by making text bold.
On your webpage, write out some text. Have a go at making parts of it bold using <strong>, emphasised with <em> and making links to other websites.
Hierarchy
The last thing to understand about formatting text with HTML is text hierarchy. In most contexts for writing, we have parts of the text that are more or less important than each other. And these differences can - and should - be reflected in your HTML markup.
Headings
Headings in HTML can be written using the tags <h1> to <h6>. h1 is the most important heading on your page. h6 is the least important level of heading. The important thing to remember about these tags is that the number doesn't indicate the order of the headings, rather the importance. <h1> is usually the main heading of the page, and there should only be one h1 on the page. In fact, if you include multiple <h1> on your page, your page is no longer valid HTML.
<h2> should be used for subtitles, or titles of sections on your page.
<h3> should be used for titles that are less important than <h2>, and so on, right down to <h6>.
Using headings to break up your text is important as it will improve readability of your texts, but it will also help search engines such as Google understand which parts of your page are important.
On your webpage, write out (or copy paste) some text.
Try applying different headings (h1 to h6) to different parts of text. Take a look at the way the text behaves and the differences in style.
Question: In your opinion, are h1-h6 block elements, or inline elements?
Semantic markup
Now we've seen the basic markup tags for marking up our content, let's think about what the text is for.
Text published online needs to be accessible not just to users using a browser, but also to search engines, in order that they understand the content available on each page and rank it in Google.
For this reason, HTML5 encourages the use of semantic markup. Semantic tags are basically just tags with little or no formatting value, but that indicate what the meaning of a section of your website is.
So for example, the tag <section> is a semantic tag. It is identical in every way to the tag <div>, except that it indicates that this part of the page constitutes a section.
Other semantic block elements include :
<nav>- for indicating navigation menus<article>- for delimiting the content of an article<aside>- for indicating subsidiary content<details>- to indicate details<figure><header>- not to be confused with<head>,<header>is a block section like a div for the header of your page content<footer><main>
These elements are all identical to the div element, except that they give us further information on the role of each part of the page.
Even if they don't add anything in terms of layout, you should use them logically in your code to make it as easy to understand as possible by Search Engines.
Example of semantic markup
<nav>
  <a href="/html/">HTML</a> |
  <a href="/css/">CSS</a> |
  <a href="/js/">JavaScript</a> |
  <a href="/jquery/">jQuery</a>
</nav>

<article>
  <header>
    <h1>What Does WWF Do?</h1>
    <p>WWF's mission:</p>
  </header>
  <p>WWF's mission is to stop the degradation of our planet's natural environment,
  and build a future in which humans live in harmony with nature.</p>
</article>
Have a read and follow the tutorial of the W3C Schools article on HTML semantics.
Images
Images can be added to your site using HTML.
In order to add images to your site, ideally the image needs to be stored on your server. This involves copying the image and placing it in a folder somewhere logical near your .html files.
In the same folder as your first web page, create a folder called images.
Place an image in this folder (any will do), and rename the image to remove all the spaces and capitals in the filename. I.e. if your image is called something like 'My Awesome Image.jpg' rename it to my-awesome-image.jpg.
Note: Capitals and spaces can cause issues with cross-server compatibility on the web (as not every operating system deals with them in the same way). As such, the convention is to remove all spaces from URLs and remove all capitals, so as to avoid problems.
Note: if you are using a Windows computer, you may not see the file extension (the .jpg or .png) at the end of the file name. You should activate this option on your system as it is necessary to see the complete file name: How to show or hide file extensions in Windows
Now add the following code to your text document, replacing my-awesome-image.jpg with the filename of your image:
<img src="images/my-awesome-image.jpg" alt="My Awesome Image">Refresh your browser page. You should see your image. If you see a 'broken image' indicator, check that the filename is exactly correct, and that the image is located in the correct folder (images). Make sure you follow the upper/lower case of all the file names.
Bravo! Now you have an image. Let's take a look at this code:
<img>is the image tag. You'll notice it doesn't have a closing tag! This is because it's what is called a 'self-closing' tag, that is, it doesn't wrap around any content, so we don't need to close it. When writing self-closing tags, the convention is to write them with a trailing/, that's that/before the>at the end of the tag.src=here we have another attribute: source. Source tells our browser where to look for the image to display.images/my-awesome-image.jpg- this is the location where the file of the image is. When we're working with the web, there are 3 types of locations that browsers recognise:- Full URLs like
http://mywebsite.com/my-images/image.jpg - Relative URLs such as
images/my-awesome-image.jpg. This tells the browser : from the current location, look for the folder 'images' in the same place, then look in it for the file 'my-awesome-image.jpg'. This means if our HTML is on our server athttp://myawesomeserver.com/exercises/ex.htmlthen the browser will look for the 'images' folder inhttp://myawesomeserver.com/exercises/, the same folder as the html file. This means it will look for the image inhttp://myawesomeserver.com/exercises/images/my-awesome-image.jpg. - Absolute URLs such as
/images/my-awesome-image.jpg(notice the starting 'slash'). This indicates regardless of the current location look for the folder images at the root on this server. This means if our HTML is on our server athttp://myawesomeserver.com/exercises/ex.htmlthen the browser will look forhttp://myawesomeserver.com/images/my-awesome-image.jpg, ie from the server root.
- Full URLs like
Linking pages together
We already saw a tags, which let us generate links.
What we want to show now, is how to link two pages together on the same site.
Create a new file 'my-new-file.html' and write some content in it. Save it next to (in the same folder as) your current .html file.
Now write the code
This is my <a href="my-new-file.html">link to a new file</a>.Save and refresh. What happens when you click the link in the browser?
Congratulations, you're surfing your own mini website :)
The URLs for these hyperlinks work in exactly the same way as the URLs for the image source. You can use a full URL, a relative URL or an absolute URL.
Exercises
Phew ! That was a lot of information.
Hopefully you've gotten the basics of coding in HTML down.
Have a go at the following exercises on your own time. If you run into trouble, check out the tutorials below for help and guidance.
I recommend you don't copy-paste text from this lesson, but rather learn to write HTML by hand!
Ungraded Exercise : 1
This is an ungraded exercise for practice only, you don't need to submit it for grading
1.1 Using the code below, create a web page which includes an article element.
<!DOCTYPE html>
<html>
<head>
  <meta charset="utf-8">
  <title>Learn HTML</title>
</head>
<body>

</body>
</html>
1.2 Add some bold, and some italic text.
1.3 Add an image to your article
1.4 Add paragraphs to your article.
1.5 Add some headers to your article.
Ungraded Exercise : 2
This is an ungraded exercise for practice only, you don't need to submit it for grading
Take a look at this W3C Article explaining how to use <ul> to make lists.
2.1 Add an unordered list of bullet-points to your document.
2.2 Turn it from an unordered-list to an ordered-list.
2.3 Add at least one link inside one of your list items.
2.4 Make your link also italic using <em>
Ungraded Exercise : 3
This is an ungraded exercise for practice only, you don't need to submit it for grading
If you feel comfortable doing the previous exercise and the challenge, look at this article explaining how to create tables in HTML.
3.1 Create a table in your document with minimum 5 rows and 5 columns.
3.2 Add a table header row with column lables.
3.3 Find out how colspan and rowspan work, and use them to merge some columns.
Ungraded Exercise : 4
This is an ungraded exercise for practice only, you don't need to submit it for grading
Create a mini website
Create a new web page (with the correct header information).
4.1 On your website put a <header> element, containing a <nav> and a bullet point list of your three pages, and for your current homepage for example :
- Home
- Page 1
- Page 2
- Page 3
4.2 Create .html files for each of these pages. Add <a> links in your list to produce a list of links to the other pages on your website.
4.3 Put this navigation menu on all your pages (copy and paste).
4.4 Create some formatted text content using paragraphs, images, headings, bold and italics on each page.
You should be able to navigate from any page to any other page using the links you created.
Ungraded Exercise : 5
This is an ungraded exercise for practice only, you don't need to submit it for grading
Create a new blank HTML page.
Complete the following exercise for marking up a letter in HTML: Mark up a letter in HTML
Ungraded Exercise : 6
This is an ungraded exercise for practice only, you don't need to submit it for grading
Create a new blank page.
Create a Curiculum Vitae (Résumé) for yourself and mark it up in HTML. Use Tables, paragraphs, headings and lists where appropriate to mark-up your content. Include :
- Your basic details at the top
- A section with your Bio
- A section on your education
- A section on your professional experience.
- A photo of yourself at the top
You should respect the following constraints:
- The important information should be marked up with strong importance.
- The HTML should be valid (you can use the W3C validator to check it).
- Headings and tables should be used where it seems sensible.
Don't worry too much about the page layout - without knowing CSS to apply style to your text your options are limited. Using the HTML we learned in this lesson should be sufficient.
Further reading
Next time we'll be going deeper into HTML and looking at CSS to give some style to your HTML elements.
Prepare by having a read of the following articles: