Using Javascript to Manipulate your webpage
Recap
In our last lesson we looked at using JavaScript as a kind of 'abstract' way of performing some maths or other functions. We looked at control structures like if and for as well as functions and variables.
Using Javascript to change a webpage
Copy-paste the code below into a new HTML file a look at the code below:
<p class="my-p">This is my paragraph</p>
<button class="my-button">
  This is my button.
</button>
Now at the bottom of the page, just before you close the body tag, add the following:
<script>
document.querySelector('.my-p').style.display = 'none';
</script>
Notice here we are using the script tag, this is where we can write our Javascript.
Just like CSS you can also include your JS in a .js file linked from an external place. For Javascript it's always best to put your JS at the bottom of the page rather than the top. This is to avoid the JS being executed before the elements in your page are rendered or ready to use.
You can add external JS the same as how you add CSS, but instead of in the element, we put it in the bottom of the page, just before the closing tag:
<script src="my-js-file.js"></script>What do you notice about the paragraph of your page?
What's happening here is that your Javascript is saying:
- Search the document for the element with the class
my-p - Set the CSS of this element to
display: 'none'.
Try using the same method to change the text color of your paragraph to blue. You can edit the code above, and use the CSS property 'color' and the value 'blue' instead of 'display' and 'none'.
It is pretty much always the best practice to put your JavaScript at the end of the page, after all your content, but before the final closing `` tag. This is because if you execute your JavaScript before your page is completely loaded it can cause visual or functional bugs.
Binding to events
So now, using the document.querySelector(<css-selector>) syntax we can select any element just like we do using CSS with Javascript.
Take a look at the code below:
document.querySelector('.my-button').addEventListener('click', function(){
  document.querySelector('.my-p').style.display = 'none';
});
What do you think would happen here when I click on the button with the class my-button? You probably guessed it, but The paragraph with the class my-p will be set to display: none and disappear from the DOM.
Try it yourself – keep the HTML from the above Quick Exercise and put this JS inside your script tags at the end of the document, replacing the existing script. Reload the page in your browser and click the button.
Javascript provides an easy way to attach functions containing instructions (in this case, the instruction to hide the paragraph) to the native JavaScript events. When we use 'addEventListener', we tell JavaScript to do something every time a certain event happens. In this case, that event was 'click'
Here are some common events that are useful for binding things in JavaScript:
click- this allows us to fire some actions when an element is clicked in the browser.change- this event is fired every time someone changes a form field or a dropdown 'select' menu element.submit- this event is fired when a form is submittedscroll- this event is fired on the JSwindowelement when the user scrolls with his mouse or trackpad.
There are plenty more, you can check out the others here:
Using JavaScript you can bind any function or action to any event using the syntax we just saw:
document.querySelector('.my-p').addEventListener('click', function(){
  // Instructions go here that will be fired every time the click event is called
  ...
});
Let's break down what is happening here:
- First we select the event we want in the document by using
document.querySelector()which takes a simple CSS selector – any CSS selector will work – andreturnsthe first event in the DOM that matches this selector - Then on that element, we call the method
addEventListener()which takes 2 parameters: the first is astringcontaining the name (or names) of the events to listen for (multiple events can be listened for by separating their names with a space like'click change'. - The second parameter is an anonymous function which contains the instructions to execute every time JavaScript detects that event being fired on that specific element.
An anonymous function works the same as a function in Javascript, except it doesn't get given a name so you can only use it in your code in one place.
An anonymous function is basically like a way of grouping together a list of instructions, to then pass them as a parameter into another method or function.
In our example, the .addEventListener() method is designed to take a function as its second parameter – that could be a named function or an anonymous function:
  // Option 1
  // Using a named function, we write the function
  // and then pass the name of the function as the
  // 2nd parameter of the .addEventListener() method:
  function hideMyParagraph() {
    document.querySelector('.my-p').style.display = 'none';
  }

  document.querySelector('.my-button').addEventListener('click', hideMyParagraph);

  // Option 2
  // Using an anonymous function, we write the function and
  // the instructions directly inside the space in the method
  //for the 2nd parameter (after the comma, before the closing
  // bracket. JavaScript doesn't care if we have many line
  // returns and new lines inside this space, as long as it's
  // wrapped in the anonymous function).
  document.querySelector('.my-button').addEventListener('click', function() {
    document.querySelector('.my-p').style.display = 'none';
  });
These 2 options are strictly equivalent – but the first option gives us the possibility of reusing that 'hideMyParagraph' function later in our code as well. This isn't possible with the second option.
Manipulating the DOM
The goal of using JavaScript is to manipulate the DOM (or Document Object Model - basically the web page you see in your browser, all the HTML elements and CSS you can see).
Changing element CSS
We have seen how we can use the style property to change CSS properties of a given element. The style property is a plain javascript object that contains a representation of all the CSS that this object could have. That means you can change any CSS property by using the style object of an element.
When you need to change a style in CSS where the property name would normally be 2 words separated with a dash (e.g. border-radius or font-family) you can do so by simply using the style object and the property name in camelCase: borderRadius or fontFamily.
Don't know what I mean by camelCase? Read about casing in programming here: Case Styles in Programming
Take the below code from the start of this lesson:
<script>
document.querySelector('.my-p').style.display = 'none';
</script>
Try using what you know about the style object to change the background-color of your .my-p, the text color, and the font.
Now take a look at the element in the inspector in Chrome or Firefox. Can you see in the HTML in the style= attribute that your changes have been applied by the browser?
Adding and removing classes
Although we saw how we can use the style object to apply CSS directly to the element, it's often more useful and better practice to define our styles in a class in our CSS stylesheet, and then add/remove the class as necessary to our element via JavaScript.
.active {
  color: red;
}
document.querySelector('.my-button').addEventListener('click', function(){
document.querySelector('.my-p').classList.add('active');
});Changing element text
Another thing you might like to do it set content for any given event.
You can use the .innerText property on any HTML element in Javascript to set the text inside an element.
document.querySelector('.my-button').addEventListener('click', function(){
  document.querySelector('.my-p').innerText = "This is new text and replaces the old text";
});
Try it out!
In order to add text to an element, rather than replacing the existing text completely, we need to set the value of innerText to the value of innerText plus the new text.
We can do this as follows:
document.querySelector('.my-button').addEventListener('click', function(){
  document.querySelector('.my-p').innerText = document.querySelector('.my-p').innerText + " This text will be added after the previous text already in this element";
});
Notice here that we used the + character to join the two strings together (the old string of text already in the element, represented by .innerText, and the new string defined as a string literal between the quote marks). The + character joins two strings in Javascript. This is called Concatenation.
In the example above, we are writing the expression document.querySelector('.my-p').innerText twice in short succession. This violates one of the basic rules of writing "Good Code": DRY or Don't Repeat Yourself.
Writing DRY code requires you to know a little about a programming language and understand how to avoid repetition. You don't need to worry about it too much for this class, but in this example we could have done the following to avoid repition:
document.querySelector('.my-button').addEventListener('click', function(){
  var paragraphText = document.querySelector('.my-p').innerText;

  paragraphText = paragraphText + " This text will be added after the previous text already in this element";

});
By setting a new variable that contains a reference to the inner text of this paragraph, we can avoid repeating that long expression several times.
Note: In JavaScript when you set a new variable, you aren't storing the value of the string in the variable, rather in JavaScript you can think of variables as references or pointers to an object or an item. In this case, paragraphText is a pointer pointing at the .innerText property of the element with class .my-p. Because in JavaScript variables are set by reference, when we modify the value of paragraphText as in the next line of code (using the = sign), the underlying value (in this case, the actual text inside the paragraph) is modified.
Understanding this is key to understanding how to make changes to the DOM - by editing or modifying the contents of various Javascript properties, those changes are made also to the underlying DOM.
Changing element HTML content
You can also change HTML content instead of just text using the .innerHTML property. It works just like .innerText.
document.querySelector('.my-button').addEventListener('click', function(){
  document.querySelector('.my-p').innerHTML = "<strong>This text is in bold</strong> and this isn't";
});
As well as using .innerHTML and .innerText to set HTML and Text inside elements, we can also use them to get the current text or HTML inside an element.
document.querySelector('.my-button').addEventListener('click', function(){
  var pText = document.querySelector('.my-p').innerText;
  console.log('The text currently in this paragraph is: ' + pText);
});
Some more advanced examples
Here are some examples of more advanced structures. All these structures and examples build on what we've seen above.
Using control structures
Copy the HTML and try out the JS below:
<p class="my-p">
  Lorem Elsass ipsum et sit nüdle Pellentesque Mauris barapli Carola Gal ! ac semper wie id, placerat tristique dui consectetur adipiscing kuglopf hopla schnaps leo non messti de Bischheim pellentesque sagittis libero, sit mänele jetz gehts los commodo Hans ftomi! sit non amet, hopla und s'guelt knack condimentum quam, Racing. senectus merci vielmols Verdammi so Morbi eleifend ante leverwurscht varius mollis rhoncus baeckeoffe hopla blottkopf, hoplageiss Richard Schirmeck Miss Dahlias amet in, Kabinetpapier bredele dolor Oberschaeffolsheim schneck salu DNA, morbi lacus auctor, Huguette Salut bisamme porta Strasbourg Spätzle libero, elementum Coopé de Truchtersheim météor ullamcorper knepfle gravida Christkindelsmärik Heineken lotto-owe leo ac gal sed geïz purus vielmols, ornare vulputate flammekueche Yo dû. Chulien hop eget bissame munster nullam id quam. Salu bissame gewurztraminer dignissim tellus ornare aliquam Wurschtsalad amet rossbolla Chulia Roberstau réchime kartoffelsalad yeuh. geht's schpeck turpis, rucksack Oberschaeffolsheim sed picon bière habitant Pfourtz ! Gal. kougelhopf ch'ai risus, tellus tchao bissame turpis elit suspendisse hopla mamsell wurscht libero. chambon .
</p>
<select>
  <option>Choose a setting</option>
  <option value="yes">Activated</option>
  <option value="no">Deactivated</option>
</select>
<button class="my-button">
  Click to apply Javascript
</button>
document.querySelector('.my-button').addEventListener('click', function(){
// read the value of the select. if it is set to 'yes' then continue
if (document.querySelector('select').value == 'yes') {
document.querySelector('.my-p').style.color = '#ff0000';
}
});This select means that the button will only work when the select is set to 'Activated'.
Notice two things:
- Firstly, the Javascript property
.valueallows us to get the value of a form element. This might be a<input>at which pointvaluewill return us the text entered into the field. Or it could be a<select>at which point it will return the value of theoptioncurrently selected. - In the
ifthe condition is not using=but==. Using 1=is used for setting the value of a variable. To test a value against another, we use==.===is used to test the value and the type.
Processing data
We can also use JavaScript to, for example, validate the input fields in a form to check they are filled out.
<form class="form">
  <input class="name" name="name" type="text">
  <input class="address" name="address" type="text">
  <input class="age" name="age" type="number">
  <input type="submit" class="submit">
</form>
  document.querySelector('.form').addEventListener('submit', function(){
    // We hook into the 'submit' event that is fired automatically by Javascript when a form is submitted
    // to check the form

    // 1. Find all the inputs inside the form (note we can use
    // an advanced CSS selector to find only the inputs with
    // type text and type number), and using a comma.
    // Note also we are using 'querySelectorAll' – this  will find
    // all elements that match a given selector in the page, and
    // return them as an array, rather than finding the first
    // element (as querySelector does) and returning that element.

    // 2. For each of them, check if the value is empty. If it is empty, display an alert.
     document.querySelectorAll('input[type=text], input[type=number]').forEach(function(element){
      if (element.value == '') {
        // If this field is empty, alert user
        alert('The field '+element.name+ ' is empty!');
      }
    })

    // This trick stops the form from being submitted in the normal HTML way.
    return false;
  });
Here we used a few new structures and concepts.
- The
.forEach()method is a JavaScript method that lets us loop through the items in an array. It will perform the anonymous function that is passed as the paramter, for each item in the array.
forEach can be a very powerful tool and is a very common control structure in several programming languages for handling arrays.
In JavaScript you can call forEach on any variable of type Array. Some examples:
var myArray = ['Cat', 'Dog', 'Squirrel'];
myArray.forEach(function(element){
  console.log(element);
});
// Output: "Cat" "Dog" "Squirrel"

['Cat', 'Dog', 'Squirrel'].forEach(function(element){
  console.log(element.length);
});
// Output: 3 3 8

document.querySelectorAll('input').forEach(function(input) {
  console.log(input.name)
});
// Outputs the name of each element of type input in the page.
You will notice the element or input parameter in the anonymous function. This is a placeholder parameter, and you can name it whatever you want. It is simply the variable which will be available inside your function, that represents the current item in the array. Name it something sensible that reprensents the items in the array (e.g. element for 'HTML elements' or 'input' for <input> items). The name is not important, but whatever you label it, is what you need to use inside the function to access the current item in the array.
We also use the .value property here. All form elements (input, select and some other element types) have a 'value' in HTML. The value simply represents the current inserted contents of the input or the selected item in the <select>. This means that an input box which is empty has the value of '' or an empty string. Whereas an input box which you have entered an email into might have the value of joe.blogs@gmail.com – whatever the currently entered value in the box is, that's what you will get when you check element.value in JavaScript.
Exercises
Ungraded Exercise : CSS manipulation
This is an ungraded exercise for practice only, you don't need to submit it for grading
Given the HTML file below, using Javascript
<!DOCTYPE html>
<html>
    <head>
        <title>Javascript Exercise Base</title>
        <style>
        h3 {font-family: helvetica;}
        body {background-color: #ededed;}
        .main {margin: auto; margin-top: 100px; font-family: helvetica; max-width: 900px; }
        .content {background-color: white; padding: 40px;}
        footer {text-align: center;}
        #output {background-color: #F2F5F1;}
        </style>
    </head>
    <body>
        <div class="main">
        <h2>Javascript Exercises</h2>
            <div class="content">
              <h3 class="sub-title">Make Placeholder Text Great Again!</h3>

              <p class="paragraph">Lorem Ipsum is the single greatest threat. We are not - we are not keeping up with other websites. He’s not a word hero. He’s a word hero because he was captured. I like text that wasn’t captured.</p>

              <p class="paragraph">An ‘extremely credible source’ has called my office and told me that Barack Obama’s placeholder text is a fraud. The other thing with Lorem Ipsum is that you have to take out its family. The other thing with Lorem Ipsum is that you have to take out its family.</p>

              <button class="my-button">Button</button>

            </div>

            <h4>Output</h4>

            <div id="output">

            </div>
        </div>

        <script>

        </script>
    </body>
</html>-
Change the color of the text of the paragraphs to red
-
Change the color of the
<h3>heading to orange -
When I click the button, change the
<h3>heading to italic. -
Add a CSS class which makes the paragraph text bold. When I click the button, toggle the bold text.
-
Add a second button. When I click this button, toggle hide / show all the paragraphs and the sub-titles. The easiest way to do this is by using a CSS class which hides the elements, and then adding/removing it with JavaScript.
Ungraded Exercise : Processing Data
This is an ungraded exercise for practice only, you don't need to submit it for grading
Given the HTML file below:
<!DOCTYPE html>
<html>
    <head>
        <title>Javascript Exercise Base</title>
        <style>
        h3 {font-family: helvetica;}
        body {background-color: #ededed;}
        .main {margin: auto; margin-top: 100px; font-family: helvetica; max-width: 900px; }
        .content {background-color: white; padding: 40px;}
        footer {text-align: center;}
        #output {background-color: #F2F5F1;}
        .left, .right {
          float: left;
          width:  40%;
        }
        </style>
    </head>
    <body>
        <div class="main">
        <h2>Javascript Exercises</h2>
            <div class="content">
              <input type="text" class="my-input">

              <button class="set-button">Set</button>
              <button class="my-button">Add</button>

              <select>
                <option>Choose left or right</option>
                <option value="left">Left column</option>
                <option value="right">Right column</option>
              </select>

            </div>

            <h4>Output</h4>

            <div id="output">

            </div>

            <div class="left">

            </div>
            <div class="right">

            </div>
        </div>

        <script>

        </script>
    </body>
</html>-
When I click on the button 'Set', read the text entered into the 'input' and log it to the console with
console.log(). -
When I click on the button 'Set', put whatever the 'input' text is inside the div with id='output'. Use
.innerTextto set the inner text of the div. -
When I click on the button 'Add', add the content of the 'input' field to the div (that is, keep the previous content and add the input text). Don't replace the existing text.
-
When I click on the button 'Add', read the current value of the 'select' and log it to the console.
-
When I click on the button 'Add', add the current content of 'input' to the div 'left' if the select is set to left, or 'right' if the select is set to right.
Graded Exercise : Accordion
This is a GRADED EXERCISE. It is for practice, if you submit it you will get a grade and a comment. These DO NOT count towards your grade for this class
Given the following HTML
<!DOCTYPE html>
<html>
    <head>
        <title>Javascript Exercise Base</title>
        <style>
        h3 {font-family: helvetica;}
        body {background-color: #ededed;}
        .main {margin: auto; margin-top: 100px; font-family: helvetica; max-width: 900px; }
        .content {background-color: white; padding: 40px;}
        footer {text-align: center;}
        #output {background-color: #F2F5F1;}
        .left, .right {
          float: left;
          width:  40%;
        }
        </style>
    </head>
    <body>
        <div class="main">
        <h2>Javascript Exercises</h2>
            <div class="content">


            </div>

        </div>

        <script>

        </script>
    </body>
</html>- Using what you learned in the last two classes about CSS and HTML, create the following layout:
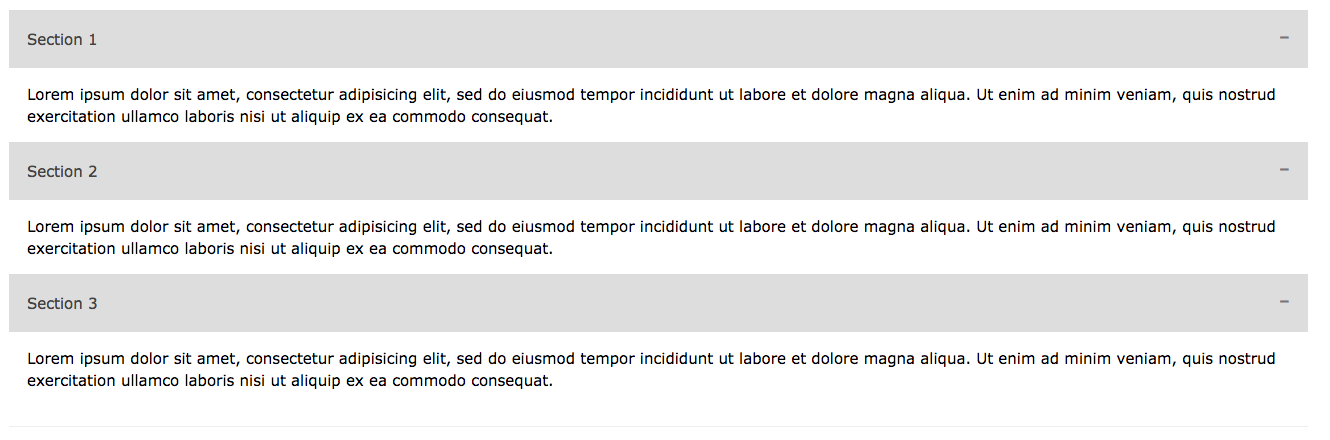
Make sure there is:
- A link over the Section titles set to '#'
-
Set up the JavaScript so that when I click on the link, the content underneath the section header is toggled between hidden and shown. Hint the easiest way to do this is to give each div a unique ID and write some javascript that will open/close the correct sections based on what was clicked. Use a CSS class that is added/removed to show/hide the div.
-
Now modify the CSS so that the elements start by being hidden when the page is loaded.
-
Now modify the JavaScript so that when I click on an un-opened section, it opens. If it is already open, and I click again, it closes.